The Drama Surrounding TypeScript’s Removal in Turbo 8 by DHH

In the fast-paced world of software development, even the most respected figures can spark cowntroversy. This time, it’s David Heinemeier Hansson, better known as DHH, a Danish-American software engineer famous for creating the Ruby on Rails web framework. The latest uproar comes from his announcement that Turbo 8, a toolchain for frontend development, will be dropping TypeScript in its next release.

In a blog post, DHH candidly expressed his preference for JavaScript’s simplicity and flexibility. While he acknowledged TypeScript’s merits and its thriving community, he argued that it complicates development without providing sufficient benefits for their project.

However, this decision wasn’t without its critics. Many developers pushed back against DHH’s move, leading to a heated debate (see this).

I think what sets this situation apart is DHH’s unapologetic stance. Despite the pushback, he disregarded all the comments and merged the pull request, raising eyebrows across the tech community.

The decision triggered a wave of responses from tech influencers. Some were against DHH’s move, while others supported it. One individual, Theo, even created a pull request to reintegrate TypeScript into the repository, receiving a positive response and engaging in a back-and-forth with DHH.

The Core Issue

Is DHH’s decision justified? It’s essential to separate DHH’s reputation for being somehow arrogant and dismissive when facing criticism from the real issue at hand: the removal of TypeScript.

TypeScript, often considered “meh” by some, offers static typing and is great for onboarding new developers. However, as DHH noted, it can lead to code bloat without adding significant value. He also praised the compatibility between JavaScript and TypeScript, allowing developers to choose between the two.

The question remains: why remove TypeScript and deprecate type libraries maintained by the Turbo project?

It is about User-Friendly vs. User-Hostile

While there is nothing inherently wrong with moving away from TypeScript, the removal might be seen as user-hostile. It could create difficulties for less-experienced users who rely on TypeScript’s safety net.

In the end, it’s a complex issue with valid arguments on both sides. Developers like DHH, who drive both race cars and software innovation, make bold decisions. Perhaps, this drama serves as a reminder for all of us to be adaptable developers who don’t go on Twitter rants when faced with tools we don’t particularly like.

In the ever-evolving world of software development, opinions will clash, and changes will happen. As for Turbo 8 and TypeScript, only time will tell how this controversy plays out in the world of coding. Meanwhile, I guess, different strokes for different folks. 🙂

Read more:

Share
The Drama Surrounding TypeScript’s Removal in Turbo 8 by DHH

Bun in Fun

Recently, Bun 1.0 was released, offering exciting new possibilities for JavaScript developers.

About Bun

At its core, Bun is a drop-in replacement for Node.js that focuses on backward compatibility while significantly improving performance. It’s designed to handle JavaScript and TypeScript (TSX) files seamlessly, all without the need for additional dependencies. The creator of Bun highlights its ability to replace traditional npm run commands, making the development experience smoother and faster.

But, why choose Bun?

  1. Improved Performance:
    Bun leverages JavaScript Core, the same engine used by Safari, which offers faster boot-up and runtime speeds compared to V8 (used by Chrome). Benchmarks indicate that Bun can handle more requests per second, a crucial advantage when dealing with high-demand applications.
  2. Simplified Imports:
    Bun abstracts away the complexities of ES6 and CommonJS imports. You can import your files without worrying about underlying implementation details, streamlining your development process and reducing configuration overhead.
  3. Watch Mode:
    Bun features a built-in watch mode, similar to Nodemon. This allows for rapid code changes and automatic reloading, significantly improving the developer’s experience.
  4. Speedy Testing:
    Bun shines when it comes to running unit tests. Benchmarks show that it can execute Jest unit tests much faster than traditional setups, potentially reducing test times from seconds to fractions of a second.
  5. Potential Cost Savings:
    Faster development and testing can lead to substantial cost savings in CI/CD pipelines. Shorter execution times translate to reduced infrastructure costs when running tests on services like GitHub Actions or Circle CI.

Limitations to Consider

While Bun is promising, it’s essential to note its limitations. It might not be suitable for all types of projects, as it relies on JavaScript Core. For example, it currently does not support running projects built with Next.js or Remix, which depend on Node APIs.

Future Possibilities

Despite these limitations, there are exciting possibilities for Bun’s future. Users are exploring options like running Bun on AWS Lambda by wrapping the Bun server in a Docker container, opening up opportunities to use Bun with familiar cloud providers.

Bun presents a compelling alternative for Node.js developers looking to boost their development speed and efficiency. Its focus on performance improvements, simplified imports, and faster testing can make a significant difference in your development workflow. While it may not be a one-size-fits-all solution due to certain limitations, Bun’s potential benefits make it worth considering for your next project. Give it a try and see if it can supercharge your Node.js development experience.

Share
Bun in Fun

Taming Bulky node_modules Directories

It is true, a Javascript developer’s HDD can often get mysteriously full. Maintaining a tidy and organized development environment is crucial for efficient coding and project management. As your projects evolve, and everytime you run npm install, dependencies accumulate, and it’s easy to end up with unused packages that clutter your project directory and inflate its size. This is where two solutions, namely a BASH command and the “npkill” package come to the rescue. I will try to elaborate on both of them here, BASH and npkill, and demonstrate how they can simplify the process of cleaning up unused Node.js packages.

While tools like npkill offer a user-friendly and interactive way to clean up unused Node.js packages, there’s also a powerful bash command that can help you achieve a similar goal directly from your command line. This approach is particularly useful if you prefer a quick and scriptable solution to remove all node_modules folders within your project’s directory and its subdirectories. Before we dive in, just a word of caution here: use this command carefully, as it involves removing data permanently from your system.

The Bash Command

To recursively remove all node_modules folders inside the current directory and its subdirectories, you can use the following bash command:

find . -name "node_modules" -type d -prune -exec rm -rf '{}' +

Here’s a breakdown of how the above line works:

  • find .: Initiates a search starting from the current directory (.) and its subdirectories.
  • -name "node_modules": Specifies the search for directories named node_modules.
  • -type d: Filters the search to include only directories.
  • -prune: Prevents find from entering matched directories, focusing only on the top-level node_modules folders.
  • -exec rm -rf '{}' +: Executes the rm -rf command on the matched node_modules directories. The {} is a placeholder for the matched directories, and the + at the end allows multiple directories to be passed to a single rm command.

Caution and Considerations

It is very important to exercise caution when using commands that involve data deletion, like rm -rf. Before executing the command, make sure you are in the correct directory and that you fully understand the potential consequences. This method can help you free up disk space by removing unused dependencies, but it’s of course always recommended to have a backup of your project or important data before performing such actions.

Choosing the Right Approach

Both the npkill package and the bash command provide effective ways to clean up your projects. The choice between them depends on your preference for an interactive tool or a quick scriptable solution. Whichever approach you choose, maintaining a tidy and organized project directory will contribute to a more efficient and productive development workflow.

In what comes next, I will touch upon the features and benefits of using the npkill package to streamline your Node.js project cleanup process.

What is npkill?

npkill is a handy command-line tool designed specifically for Node.js developers to help them identify and remove unused packages from their projects. It provides a simple and efficient way to free up valuable disk space and streamline your development environment. With just a few commands, you can regain control over your project’s dependencies and maintain a leaner, more manageable codebase.

Key Features:

  1. Interactive Interface: Npkill offers an interactive and intuitive user interface that lists all the packages in your project directory, along with their sizes. This visual representation helps you make informed decisions about which packages to remove.
  2. Size Insights: Apart from listing the packages, npkill also displays the size of each package, allowing you to identify large or unnecessary dependencies that might be contributing to bloat.
  3. Sorting Options: You can sort the package list by size or name, making it easier to identify the most significant contributors to your project’s size.
  4. Simple Removal: Once you’ve identified the packages you want to remove, npkill makes the removal process as simple as typing a single command. You can remove individual packages or multiple packages at once.

Getting Started with npkill:

Using npkill is straightforward. Here’s a quick guide to getting started:

  1. Install npkill globally using npm:
   npm install -g npkill
  1. Navigate to your project directory in the terminal.
  2. Run npkill:
   npkill

Alternatively, you could use npx to run it more swiftly: npx npkill

  1. Follow the on-screen prompts to select and remove the packages you no longer need.

Managing your project’s dependencies is a vital aspect of maintaining a healthy and efficient codebase. The npkill package simplifies this process by providing an interactive interface to identify and remove unused packages, helping you keep your project directory clean and organized. By incorporating npkill into your workflow, you can streamline your development environment, improve project maintainability, and free up valuable disk space.

Share
Taming Bulky node_modules Directories

TIL: Using React Testing Library in Vite via Vitest

Vite is a robust tool for rapidly creating React projects. However, unlike Create React App (CRA), Vite does not come with built-in support for React Testing Library (RTL). Let us walk through the process of setting up RTL in a Vite React project using Vitest, a testing solution designed specifically for Vite. By following these steps, you’ll be able to easily write and execute tests for your Vite React applications.

Step 1: Creating a Vite React Project

Let’s begin by creating a new Vite React project. Open your terminal and run the following command:

npm create vite@latest my-vite-app --template react

Step 2: Installing Dependencies

Next, we need to install the necessary dependencies for RTL and Vitest. In your project directory, run the following command:

npm install --save-dev @testing-library/jest-dom @testing-library/react @testing-library/react-hooks @testing-library/user-event jsdom vitest

Step 3: Setting up Vitest

3.1 Create a new file called setupTests.js at the root of your project and add the following import statement:

import "@testing-library/jest-dom"

3.2 Create another file called test-utils.js at the root of your project and include the following code:

/* eslint-disable import/export */

import { render } from "@testing-library/react";

const customRender = (ui, options = {}) =>
  render(ui, {
    wrapper: ({ children }) => children,
    ...options,
  });

export * from "@testing-library/react";
export { default as userEvent } from "@testing-library/user-event";
export { customRender as render };

3.3 Open vite.config.js and add the following code:

export default defineConfig({
  // ...
  test: {
    globals: true,
    environment: 'jsdom',
    setupFiles: './setupTests.js',
  },
})

Step 4: Modifying package.json

Update the scripts section in your package.json file with the following scripts:

"scripts": {
  // ...
  "test": "vitest",
  "coverage": "vitest run --coverage"
}

Step 5: Writing Tests

Now you can start writing tests using RTL in your Vite React project. Here’s an example of a test file named App.test.jsx:

import { describe, expect, it } from "vitest";
import App from "./App";
import { render, screen, userEvent } from "../test-utils";

describe("Sample tests", () => {
  it("should render the title correctly", () => {
    render(<App />);
    const title = screen.getByText(/Welcome to My App/i);
    expect(title).toBeInTheDocument();
  });

  it("should increment count on button click", async () => {
    render(<App />);
    const button = screen.getByRole("button");
    userEvent.click(button);
    const count = await screen.findByText(/Count: 1/i);
    expect(count).toBeInTheDocument();
  });
});

Step 6: Running Tests

To run your tests, execute the following command in your terminal:

npm run test

This is how to set up React Testing Library (RTL) in Vite React projects using Vitest. By following these steps, you can seamlessly integrate testing into your Vite React applications. RTL’s user-friendly API combined with the power of Vit.

Share
TIL: Using React Testing Library in Vite via Vitest

Reflections on the Article “Why Scrum Fails”

Recently, I came across an interesting article titled “Why Scrum Fails.” As someone familiar with agile methodologies and their implementation, I was immediately drawn to the provocative title.

The author begins by questioning the misalignment between the prescribed Scrum process and its actual implementation in organizations. They argue that Scrum has become an oppressive tool for micromanagement, focused solely on story points and velocity. This sentiment resonates with many professionals, including developers, designers, product managers, and middle managers, who have developed a deep disdain for Scrum. It becomes apparent that the real issue lies in the fact that organizations often adopt Scrum while disregarding essential elements crucial for its success.

The article emphasizes the importance of a cross-functional team that possesses all the necessary skills to create value in each sprint. However, in reality, many organizations structure their teams in functional silos, hindering collaboration and inhibiting the delivery of valuable increments. This leads to a shift in focus from customers and value to story points and velocity, ultimately deviating from the core principles of agile development.

The notion of delivering a valuable, useful increment each sprint is pivotal to the Scrum framework. The article highlights the significance of using working software as the primary measure of progress. The failure to continuously deliver valuable software to customers contradicts the essence of agility itself. It becomes evident that organizations often compromise on this critical aspect, viewing themselves as exceptions rather than embracing the transformative potential of Scrum.

The concept of self-managing teams within Scrum also garners attention in the article. The author asserts that true agility necessitates empowering teams to make decisions that contribute to their own success. However, organizations often struggle with defining the role of managers in Scrum, which can inadvertently undermine team autonomy and turn the process into a mechanism of control. The need for a balanced approach to integrate management roles within Scrum becomes evident, where managers can transition into Scrum Masters, product owners, or team members, aligning their skills and interests with the new agile future.

Another thought-provoking aspect discussed in the article is the “Monkey’s Paw Problem” of Scrum. Often, organizations adopt Scrum solely to increase output, viewing it as a means to an end rather than a transformative philosophy. This narrow focus on productivity may lead organizations to resist changes that challenge existing hierarchies or disrupt the status quo. As a result, Scrum becomes a tool to track metrics and maintain output levels, rather than a framework that fosters genuine organizational transformation.

As I progressed through the article, the author raises an intriguing proposition: the potential obsolescence of Scrum. With the advent of continuous delivery, the cycle of inspection and adaptation has become more agile than ever before. The ability to deliver valuable software to customers several times a day challenges the traditional two-week sprint cycle advocated by Scrum. The author suggests exploring agility beyond Scrum, embracing continuous delivery as a more fitting approach that aligns with the values and principles of the Agile Manifesto.

In conclusion, the article provided me with a fresh perspective on the challenges and shortcomings of Scrum. It shed light on the misalignment between the prescribed Scrum process and its actual implementation, as well as the resistance to genuine organizational transformation. It prompted me to question whether Scrum has outlived its usefulness in the face of continuous delivery and whether we should explore agility beyond Scrum.

What are your thoughts on this matter? Have you encountered similar challenges in implementing Scrum? I’m eager to hear your insights. Feel free to share your experiences and perspectives in the comments below.

Share
Reflections on the Article “Why Scrum Fails”

JavaScript Objects Cheatsheet

As a follow-up to my previous post on Factory vs Constructor Functions in JavaScript, below is a collection of useful examples that aim to illustrate Objects and their related functionalities.

// Obj literal syntax
const person = { name: 'Behnam', age: 37 };

// Constructor function
function Person(name, age) {
	this.name = name;
	this.age = age;
}
const behnam = new Person('Behnam', 37);

// Class syntax (ES6+)
class Animal {
	constructor(name) {
		this.name = name;
	}
}
const bear = new Animal('Bumzy');

Accessing Object Properties

// Dot notation
console.log(person.name); // Behnam

// Bracket notation
console.log(person['age']); // 37

Modifying Object Properties

person.age = 30; // Changing existing property
person.city = "Stockholm"; // Adding new property
delete person.name; // Deleting a property

Checking if Property Exists

if ('name' in person) {
	console.log("Name exists!");
}

Looping through Obj properties

for (const key in person) {
	console.log(`${key}: ${person[key]}`);
}
// name: Behnam, age: 37

// Object.keys (ES5+)
Object.keys(person).forEach((key) => {
	console.log(`${key}: ${person[key]}`)
});
// name: Behnam, age: 37

Object Methods

const calculator = {
	add: function(a, b) {
		return a + b;
	},
	subtract(a, b) {
		return a - b;
	}
};
console.log(calculator.add(5, 3)); // 8
console.log(cakcykatir.subtract(7, 2)); // 5

Object Serialization

The snippet below first converts the person object into a JSON string using JSON.stringify(). It then parses the JSON string back into a JavaScript object using JSON.parse(). This helps transferring data between different systems.

const json = JSON.stringify(person);
console.log(json); // {"age":37,"name": Behnam}

const obj = JSON.parse(json);
console.log(obj.age); // 37

Inheritance

We’ll create a basic inheritance example involving Person and Student objects.

// Parent object constructor
function Person(name, age) {
  this.name = name;
  this.age = age;
}

// Adding a shared method to the Person prototype
Person.prototype.sayHello = function () {
  console.log(`Hello, my name is ${this.name} and I am ${this.age} years old.`);
};

// Child object constructor inheriting from Person
function Student(name, age, grade) {
  // Call the Person constructor to set name and age
  Person.call(this, name, age);
  this.grade = grade;
}

// Set up the prototype chain for inheritance
Student.prototype = Object.create(Person.prototype);
Student.prototype.constructor = Student;

// Add a unique method to the Student prototype
Student.prototype.study = function () {
  console.log(`${this.name} is studying in grade ${this.grade}.`);
};

// Create instances of Person and Student
const person = new Person('Alice', 30);
const student = new Student('Bob', 18, 12);

// Use the inherited and unique methods
person.sayHello();
student.sayHello();
student.study();

In this example:

  1. We have a Person constructor function that defines two properties (name and age) and a shared method sayHello().
  2. We then create a Student constructor function that inherits from Person. It calls Person.call(this, name, age) to set the shared properties and uses Object.create(Person.prototype) to set up the prototype chain for inheritance.
  3. The Student constructor adds its unique method study() to its prototype.
  4. We create instances of both Person and Student, and then call their methods to demonstrate inheritance. The Student object inherits the sayHello() method from the Person prototype and has its own study() method.
Share
JavaScript Objects Cheatsheet

Factory vs Constructor Functions

In JavaScript, any function can return a new object. When it’s not a constructor function or class, it’s called a factory function.

Eric Elliot

Two fundamental paradigms stand out in the realm of Javascript fundamentals: factory functions and constructor functions. These two techniques serve as the building blocks for creating objects, each with its own advantages and use cases. In this exploration, I will delve into the world of factory and constructor functions, dissecting their differences, strengths, and when to choose one over the other. Understanding these concepts will undoubtedly enhance your ability to design robust and maintainable code.

TL;DR: The General Purpose of them both is to create your object creation logic once and use either function to create multiple objects. All the credit goes to Sina for his insightful presentation of the concept on his channel, ColorCode.

Factory Function

It creates and returns an object.

function personFactory(n) {
  return { name: n }
}

const me = personFactory('Behnam')

One thing to note here is that here, we are not really using an inheritance hierarchy.

function createPerson(name) {
  return {
    // name: name, // full version
    name, // shorthand version

    talk() {
      return `I am ${this.name}`;
    },
  };
}

const me = createPerson("Behnam");
const you = createPerson("Qoli");

console.log(me); // An instance of the Obj. --> {name: 'Behnam', talk: f}
console.log(you); // An instance of the Obj. --> {name: 'Qoli', talk: f}

me.talk = function () {
  return `Hello, my name is ${this.name}`;
};

console.log(me.talk()); // Hello, my name is Behnam
console.log(you.talk()); // I am Qoli

The Problem with Factory Functions

As mentioned above, we are not really using an inheritance hierarchy.

So the two instances are not pointing to the same thing; they are DIFFERENT.

The Workaround

The Bad Approach

Here is a noteworthy, yet very BAD approach:

Object.prototype.speak = function() { // every object below it will have this speak in their proto
	return 'I can speak'
}

// So, these are all valid and available:
me.speak();
you.speak();

In other words, every object in your application has that method in it! Even if you define it after the fact, like below:

const a = {}; // new object

a.speak(); // Exists! And returns 'I can speak'
window.speak(); // Also exists! BAD IDEA

The Good Approach

Now back to solving the original problem of inheritance, as introduced above. Notice we will return something other than an empty object {}: using Object.create()

const myCoolProto = {
	talk() {
		return `Hello, I am ${this.name}`
	}
}

function createPerson(name) {
	return Object.create(myCoolProto, { // The API of Object.create is a bit different
		name: {
			value: name
		}
	})
}

const me = createPerson("Behnam")

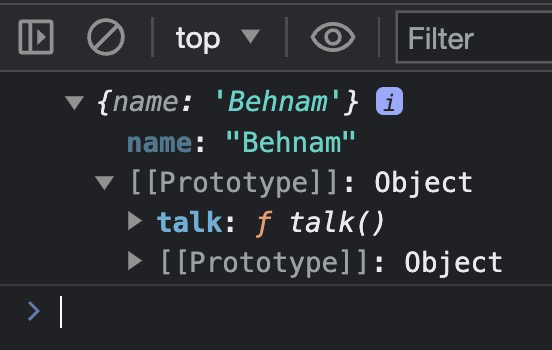
Here is the output:

const myCoolProto = {
  talk() {
    return `Hello, I am ${this.name}`;
  },
};

function createPerson(name) {
  return Object.create(myCoolProto, {
    // The API of Object.create is a bit different
    name: {
      value: name,
    },
  });
}

const me = createPerson("Behnam");
console.log(me);

console.log(me.talk()); // Hello, I am Behnam

Constructor Function

Conventionally, they start with a Capital letter and you call it with a new keyword.

function Person(name) {
	this.name = name
}

const me = new Person('Behnam') // aka an Obj. instantiation

Factory vs Constructor Functions

Below, notice the difference in what they return.

function newPerson(name) { // Factory Fn
  return {
    name: name,
  };
}

const bob = newPerson("Bobby"); // {name: 'Bobby'}

console.log(bob);

function Person(name) { // Constructor Fn
  this.name = name;
}

const me = new Person("Behnam");

console.log(me); // Person {name: Behnam}

NOW WE ARE INHERITING. It means that our Constructor function already comes with its’ OWN PROTOTYPE. In other words, Behnam is now inheriting from Person.

So we can do something like this:

Person.prototype.talk = function () {
  return `Hello, I am ${this.name}`;
};

console.log(me.talk()); // Hello, I am Behnam

const sam = new Person("Sam");
console.log(sam.talk()); // Hello, I am Sam

Summary

A few key facts about Factory Functions:

  • They are just a function.
  • They are a little Simpler.
  • There is no new keyword involved, so there is no this, therefore, they are just simpler.
  • You just return an object!
  • A little more flexible, you are really using the power of closure in a Factory. (aka Data Privacy) See the example below
function createPerson(name) {
  return {
    talk() {
      return `${name}`;
    },
  };
}

const me = createPerson("Behnam");
console.log(me); // only the talk function
console.log(me.talk()); // Behnam
console.log(me.name); // undefined - in other words, it is safe!
// This is what we call data privacy
Share
Factory vs Constructor Functions

TIL: Achieve instant boost by implementing an Enhanced Lazy Loading

Lazy loading is a technique employed to enhance website performance by deferring the loading of images until they are necessary and in viewport. In other words, rather than loading all images simultaneously, lazy loading postpones their loading until they are about to be displayed in the visible area of the webpage or when the user scrolls to them. This technique decreases the initial load time of the page and reduces data consumption, leading to quicker and more effective browsing experiences.

In practice, implementing lazy loading for images is a straightforward process accomplished by adding a solitary attribute to your image tag. By setting the loading attribute to “lazy,” you activate the lazy loading functionality for the image. The browser will then autonomously decide the appropriate timing to download the image, considering its proximity to the visible area of the screen. The primary drawback of this simple lazy loading technique is that the user will encounter an empty space in place of the image until it finishes downloading.

<img src="image.jpg" loading="lazy" />

An Enhanced approach

To implement advanced lazy loading, we can generate a small, blurry placeholder image using a tool like ffmpeg. By setting this placeholder image as the background of a <div> element, we create a visual placeholder for the full image. To ensure a smooth transition, we can hide the actual <img> element by default within the <div>.

To create a placeholder image using ffmpeg, run the following command in the command line:

ffmpeg -i testImg.jpg -vf scale=30:-1 testImg-sm.jpg

This generates a small image that is 30 pixels wide, while maintaining the aspect ratio. The next step is to create the HTML structure with the blurred image as the background of the <div>, and the full image hidden within it:

<div class="blurred-img">
  <img src="testImg.jpg" loading="lazy" />
</div>

To enhance the effect, you can add a CSS filter property to the <div> to increase the blur:

.blurred-img {
  filter: blur(10px);
}

What is more, you can add a pulsing effect to the placeholder image to indicate loading:

.blurred-img::before {
  content: "";
  position: absolute;
  inset: 0;
  opacity: 0;
  background-color: white;
  animation: pulse 3.2s infinite;
}

@keyframes pulse {
  0% {
    opacity: 0;
  }
  50% {
    opacity: 0.1;
  }
  100% {
    opacity: 0;
  }
}

To fade in the full image once it is loaded, you can add JavaScript code that listens for the image load event and applies a “loaded” class to the <div>:

const blurredImageDiv = document.querySelector(".blurred-img")
const img = blurredImageDiv.querySelector("img")

function loaded() {
  blurredImageDiv.classList.add("loaded")
}

if (img.complete) {
  loaded()
} else {
  img.addEventListener("load", loaded)
}

Finally, update the CSS to include transitions and reveal the full image when the “loaded” class is added:

.blurred-img.loaded::before {
  animation: none;
  content: none;
}

.blurred-img img {
  opacity: 0;
  transition: opacity 250ms ease-in-out;
}

.blurred-img.loaded img {
  opacity: 1;
}

With these implementations, the webpage will display a small, blurred placeholder image until the full image is loaded. The full image will then fade in smoothly, enhancing the user experience.

Share
TIL: Achieve instant boost by implementing an Enhanced Lazy Loading

Breaking the Bubble: Investigating Echo Chambers and Sentiment in Online Discourse

In today’s digital age, social media platforms have become powerful tools for expressing opinions and beliefs. I am excited to announce the launch of my new project, where I will be delving into fascinating topics related to online discourse.

One area of focus will be YouTube, one of the most popular video-sharing websites, and the evaluation of views presented on this platform. Research has shown that users not only engage with the content they see, but also with the opinions of others, often leading to the formation of echo chambers where similar ideas and perspectives dominate.

To gain deeper insights into people’s thoughts and beliefs, I will be employing sentiment analysis techniques. In a recent article, I conducted an analysis on the most-watched video of Jordan Peterson from British GQ, which garnered over 60 million views. Using natural language processing (TextBlob) and machine learning algorithms, I analyzed 30,000 comments with the most likes.

The results revealed that the majority of comments were neutral in terms of polarity, indicating a lack of clear positive or negative sentiment. Furthermore, they were not necessarily subjective. Upon manual tagging, it was found that 88 comments expressed support for Peterson, while one supported the interviewer.

This pilot study sheds light on the existence of echo chambers in online discourse, where individuals may disregard important ideas or suppress dissenting voices due to their own reinforcing beliefs. I will also explore methods to enhance the accuracy of sentiment analysis, such as incorporating libraries like VADER or SENTIWORDNET to improve precision when tagging content.

Stay tuned as I share the primary dataset and additional resources used in my analysis.

Share
Breaking the Bubble: Investigating Echo Chambers and Sentiment in Online Discourse

Sluggish apps on M1 Macs

It has been quite a while since M1 was introduced in the second half of 2020. Still, some apps like Skype and WhatsApp are not optimized for the Apple Silicon; thus, they run very sluggishly, bringing about a not-so-pleasant user experience overall.

Inspecting the Activity Monitor app, you can quickly check whether a Mac app runs on Rosetta or M1.

  • Launch Activity Monitor
  • Choose the CPU section in the top bar.
  • Once it loads up, you’ll see a column named “Kind.” If the app says “Intel,” you should download the native version, if available.

Likewise, if you go over to Is Apple Silicon Ready, you can check whether or not the app at issue is optimized for your M1 Processor.

Also related to this is the strange case of the “M1 Mac SSD Swap Memory Issue,” which was discussed in detail by Created Tech. Hypothetically, excessive use of Swap Memory has raised potential concerns about SSD longevity.

So the solution I hit upon was to use the web app alternatives. They run much smoother since the browser is already running natively on Apple’s M1 chip and reside in the background most of the time.

If you use Chromium-Based Browsers (like Chrome, Brave, and Vivaldi), You can take this a step further by creating a shortcut via the menu > More Tools > Create Shortcut and have the app icon in your dock.

Share
Sluggish apps on M1 Macs